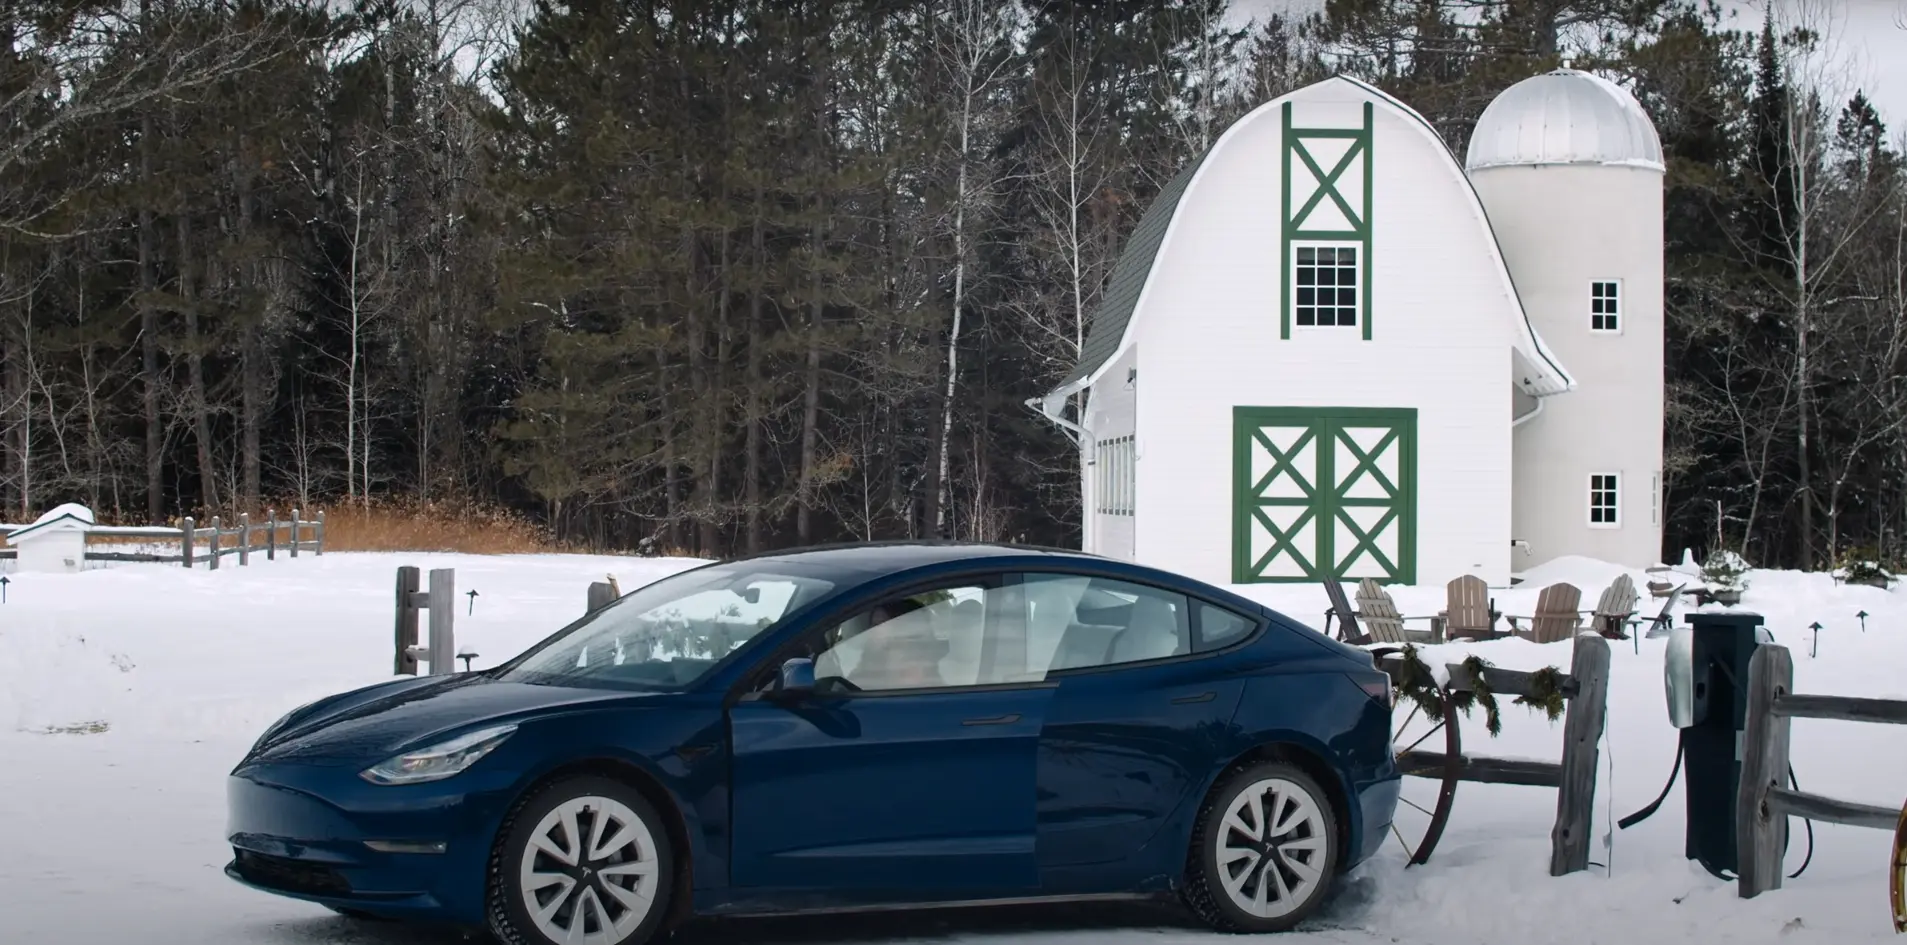
How to pre-condition Tesla battery manually
We're an affiliate
We hope you love the products we recommend! Just so you know, we may collect a share of sales or other compensation from the links on this page. Thank you if you use our links, we really appreciate it!
Table of Contents
What is Pre-conditioning
Climate has an impact on electric cars’ performance. Climatic factors such as humidity and temperature wear down the battery of an EV faster. The more these age under the circumstances, the more proper care should ensue. Pre-conditioning Tesla battery helps bring your Tesla battery to a suitable temperature before taking it out for a trip or charging. The question to how to pre-condition Tesla battery manually will be answered within this article.
Problems from extreme weather for your Tesla’s battery
The average battery temperature of a battery for an EV is around (50°F and 86°F). Batteries are most efficient at this range of temperature. Regulating the battery’s temperature helps preserve the battery cells.
Problems that stem from extreme weather conditions for your Tesla.
- Charging speeds of the EV are slower than usual when done in a colder climate. The battery requires a longer time to fully charge as compared to optimal temps.
- The range of your Tesla decreases. More energy draw is required to start and function.
- Functions such as regenerative braking are limited, which is an essential function in converting energy to usable energy. The cold batteries cannot accept the charge from a cold temperature without damaging themselves. Hence, the regenerative function is partially or fully stopped to stop battery damage.
- Capacity fading of battery due to low temperature that causes hindering in the ion diffusion within the composition of material within the battery
- Your acceleration is limited.
Methods to pre-condition Tesla Battery
Pre-conditioning battery feature on the Tesla app
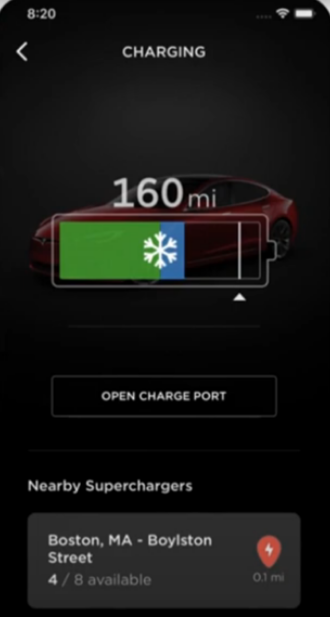
Tesla provides a climate control feature in its app; the Tesla app shows a blue snowflake on the battery icon when freezing to show that it is too cold. The vehicle should be pre-conditioned 30-45 minutes before departure. To turn on pre-conditioning, follow the step-by-step guide below.
- Launch the Tesla application from within your smartphone or mobile device.
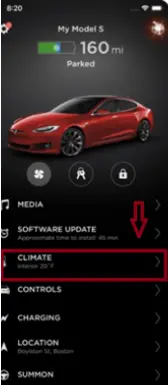
2. Navigate to the climate section from within the app. ‘Climate’ > ‘Turn On’
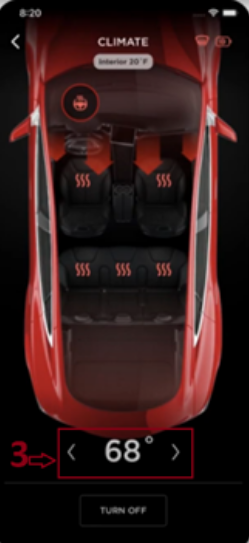
3. Change and set the desired temperature by adjusting the slider or inputting a specific temperature, or you could just set it to Auto. Try to minimize the difference in temperature offsets inside and outside by ensuring that all windows and exterior front grille intake are clear of any debris that could block airflow.
4. Tesla recommends that you best pre-condition about an hour prior to being plugged into a Tesla Charger.
5. Click on the ‘Start’ or “Pre-conditioning” button to initiate the process of pre-conditioning
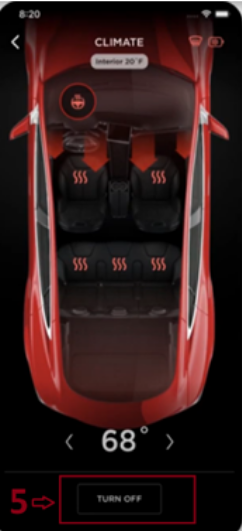
6. You’ll know the pre-conditioning is successful once a red battery icon shows up across the cabin climate control panel. The app will notify you once your vehicle has reached the specified temperature.
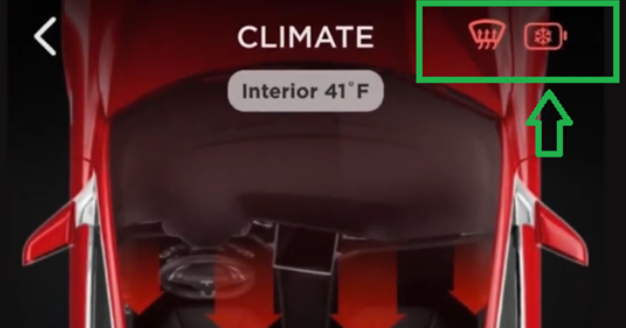
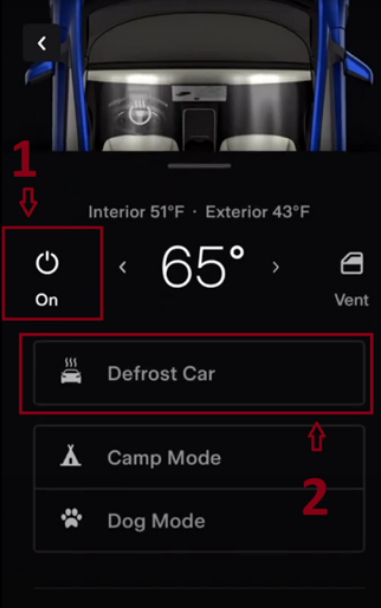
Additionally, there is an option called ‘defrost’ to allow the high-voltage battery and car to return to optimal temperatures. The defrost option functions to thaw the ice around the charge port in case it is frozen in place. The defrost option can be done by going through the Tesla mobile app navigate to ‘Climate’ >’ Defrost Car’.
Pre-condition Tesla battery through the Navigation feature
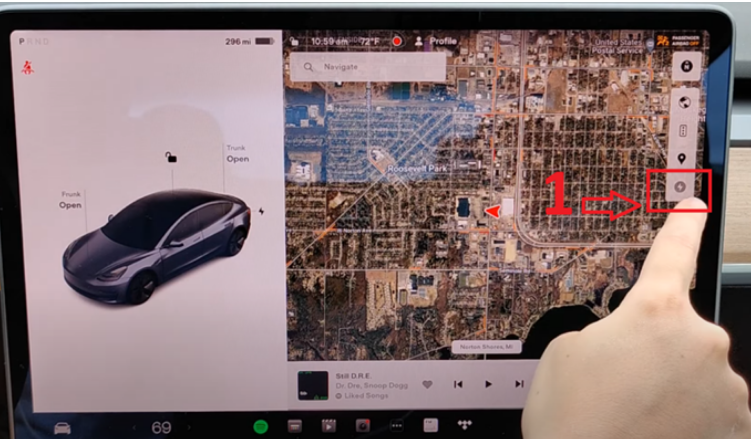
The navigation feature for the Tesla also enables pre-conditioning in anticipation of a selected supercharger station selected on screen as a destination. Tesla automatically starts to pre-condition the battery as you get closer to the supercharger, which allows the battery to warm up or cool down accordingly to allow for optimal charging. Below is the step-by-step guide on how to pre-condition the battery through the navigation system.
- From the homepage of the Tesla navigation screen, tap on the map and click on the side menu where the symbol of the supercharger is displayed.
2. Pick and choose your preferred supercharger station that is within the vicinity by clicking on the mapped Supercharger point.
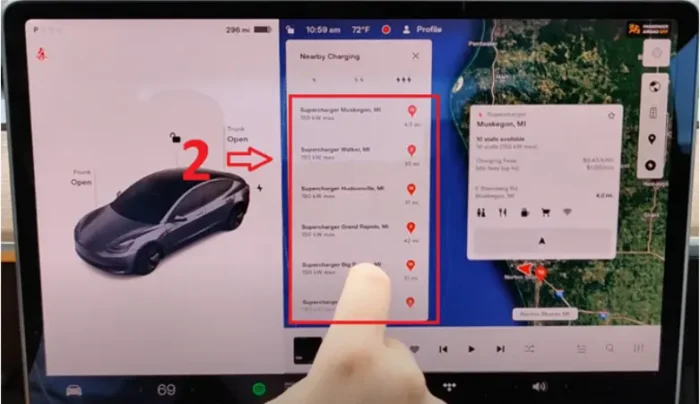
3. Once you’ve decided on which supercharger station to charge, click on the navigation button under the charger, and the Tesla will be pre-conditioned when nearing the destination supercharger.
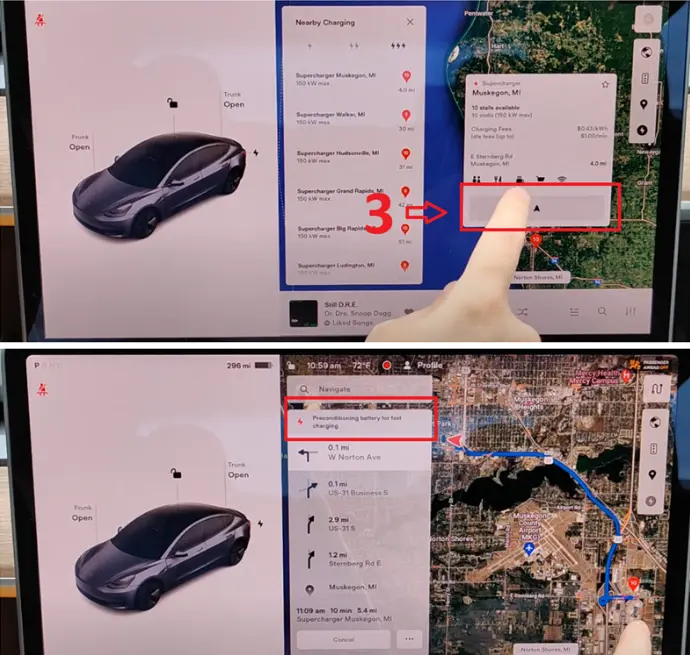
Pre-condition Tesla battery through Scheduled departure.
Setting up scheduled departure and charging can be accessed through Controls > Charging > Switch to Scheduled Charging / Scheduled Departure when the vehicle is in park mode. This feature allows Tesla to calculate when the vehicle requires pre-conditioning or charging and preps it accordingly so that the cabin climate and battery pre-conditioning are completed before your departure time.
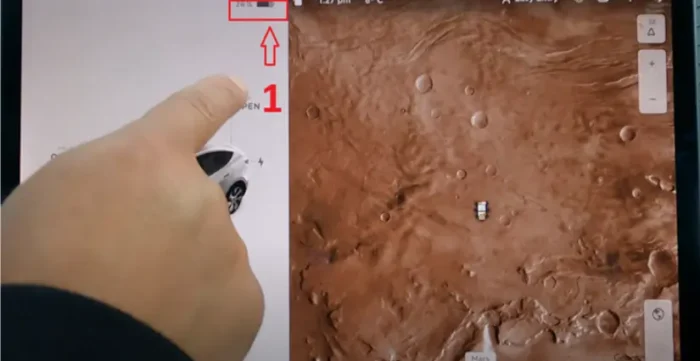
Scheduled Departure through the Tesla Media Screen
- Click on the battery icon on top of the Tesla media screen to bring up the charging details menu.
2. A menu will pop up that will show Tesla battery details. Click on the schedule button under the ‘Schedule Departure’ text. If it is not showing Scheduled departure, then click on the bottom fine text that says switch to ‘Scheduled Departure.’
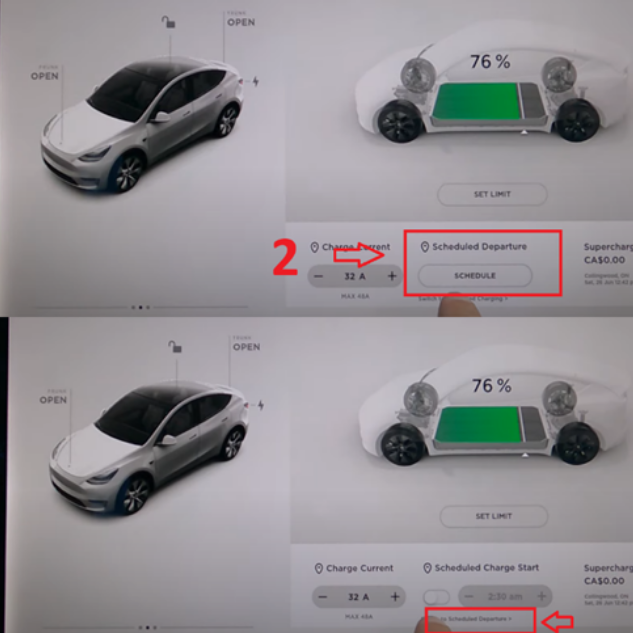
3. Once the schedule button is clicked, a pop-up menu will appear that will display a list of the times where you can input the preferred time to pre-condition. Clicking on the settings on top will allow the user to toggle on pre-conditioning or off-peak charging. In this case, select and toggle pre-conditioning.
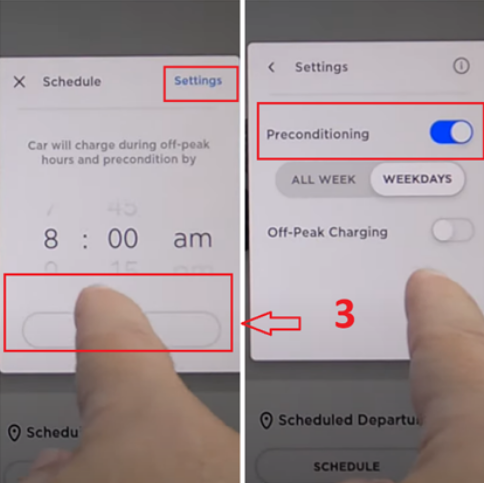
4. Once the schedule button is clicked, a pop-up menu will appear that will display a list of the times where you can input the preferred time to pre-condition. Clicking on the settings on top will allow the user to toggle on pre-conditioning or off-peak charging. In this case, select and toggle pre-conditioning.
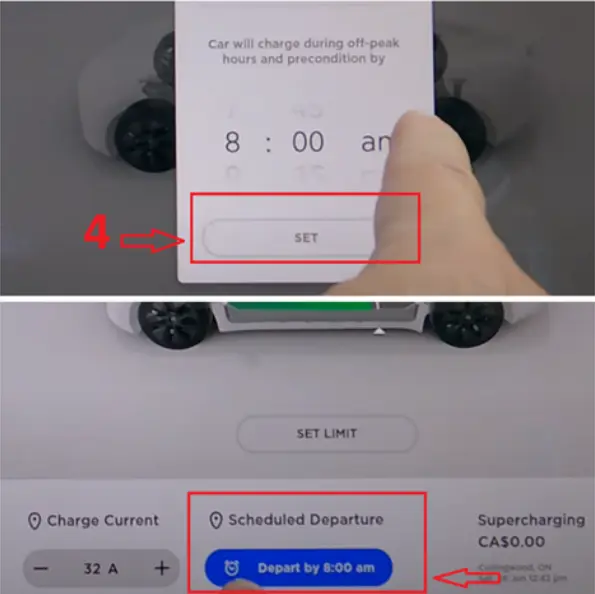
Scheduled departure through the Tesla App
- Scroll down and find the schedule tab on the Tesla Application; click on the ‘Schedule’ tab.
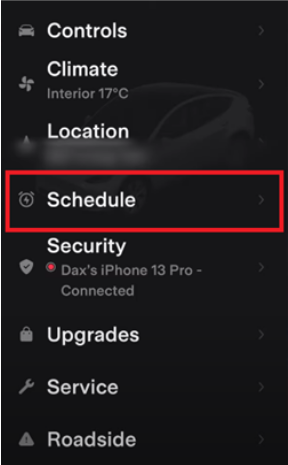
2. Once completed, it’ll open another page which will show the departure settings that contains departure time, pre-condition and off-peak charge toggles. Your current location will be displayed under the ‘Schedule’ text, departure times can be differently scheduled by location. Make sure that the tab is selected to ‘Departure’.
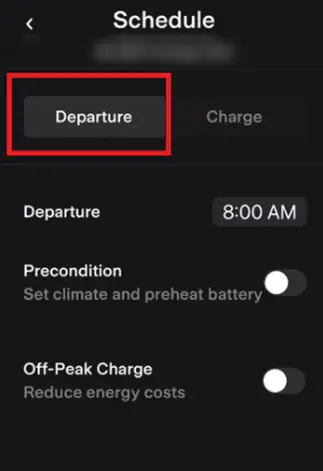
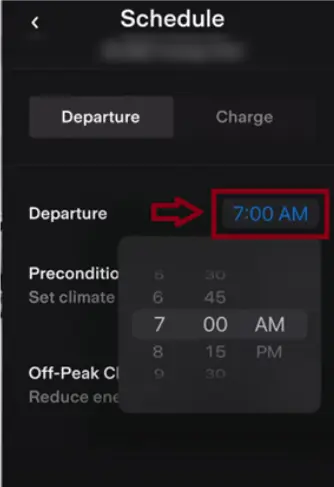
3. Change the scheduled departure time by clicking on the interactable block that has the time set and adjust accordingly to your preferred time.
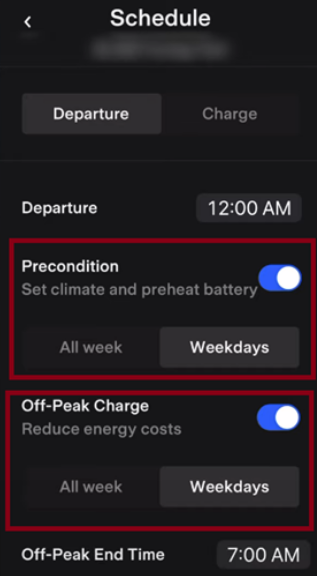
4. Next, click to toggle on the pre-condition block. Once toggled, it’ll show an option to set the climate and preheat battery following an All week or Weekday basis. The same applies to off-peak charging when toggled, choose to toggle this if you follow a tariff that follows peak and off-peak pricing.
The benefits of pre-conditioning your Tesla battery
While it’s not mandatory, it’s important to your Tesla’s battery as it helps preserve and maintain the performance under extreme temperatures.
- Extends the longevity of the battery and maximizes the range in which the Tesla can achieve.
- The electrons inside the lithium-ion battery can move most efficiently and quickly under optimum temperature conditions allowing faster peak charging speeds.
- Control of your cabin temperature ensures that your driving experience under extreme weather conditions is pleasant before the start of the journey.
- Able to charge optimally at the next designated supercharger station.
When should I pre-condition my Tesla battery?
It is advisable by Tesla to pre-condition your vehicle 30-45 minutes before departure while remaining plugged in as it allows the battery to charge the used-up charge of regulating the climate inside and preheating the battery.
Mapping towards a supercharger doesn’t pre-condition the battery for supercharging.
An owner under the Tesla Motors Club expressed that his “pre-conditioning battery for supercharging “isn’t popping up as a notification on screen. The ideal temperature for supercharging that must be met with the pre-conditioning should be above 40º C. If the notification doesn’t pop up, then check to see if the following is true.
- If it is above 100kW or higher charging peak speeds during charging, then the Tesla is not required to undergo pre-conditioning as it is already at optimal charging temperature.
- The supercharger destination must be relatively close in proximity or nearby.
How much difference does pre-conditioning the battery make before supercharging?
The convenience that the pre-conditioning brings is faster charging. If not prepared for pre-conditioning before reaching a supercharger, then the charging peak speeds that you’d receive would go as low as 40kW or less which would mean a longer time spent just charging. The battery gain you get from charging with a pre-conditioned battery will allow for much faster charging of above 100kW peak charging speeds.
Conclusion
There are a lot of advantages to pre-conditioning your Tesla battery. Under circumstances of extreme weather, it is highly beneficial that you pre-condition your Tesla battery to ensure a more pleasant driving experience. Its recommend making it a habit to pre-conditioning your Tesla battery whenever necessary as it makes charging times for superchargers significantly shorter.
Categorised in: Advice, Automotive, How-tos
